컴퓨터/기타
- Dos batch 파일 작성하는 예제 2012.09.19
- CVS NT 버그? 2010.10.19
- Tomcat에 multi instance 만들기 2010.04.29
- SKT 고객정보 암호화…해킹 '원천봉쇄' 2010.01.11
- Visual Studio 6 설치가 안될 때 해결하는 한가지 방법 2010.01.04
- 트리구조 DB에서 사용하기 3 2009.07.13
- 트리구조 DB에서 사용하기 2 2009.07.13
- 트리구조 DB에서 사용하기 1 2009.07.13 1
- MySQL 서비스 재시작 2009.06.20
- zendamf 설치하기 2009.06.20
Dos batch 파일 작성하는 예제
2012. 9. 19. 09:20
CVS NT 버그?
2010. 10. 19. 15:18
출처 : http://v.daum.net/link/3437966
수 많은 검색과 검색.... 답이 없더군요 ㅡㅡ;;
뭐 비슷한 답으로는 지우고 다시 해라는 것들... 그러나 정작 해결되지 않더군요
그렇게 헤메이다 보니... 한글파일이 있는 폴더만 그렇더군요.
그러다 어느곳에서 현재 CVS최신버전(CVS NT 2.5.04.3236) 의 버그라는 것 같더군요...
그래서 다른 버전인 CVSNT-2.5.03.2260.msi 을 찾아서 설치 했더니
언제 그랬냐는 듯이 아주 잘되더군요 -_-;; 몇일간의 삽질 끝에 이제는 잘되네요...
기념으로 CVSNT-2.5.03.2260.msi 버전 올립니다.
[ 아래 내용은 CVS NT 2.5.04.3236 버전에서의 한글파일이 있는 폴더의 경우에 해당하는 내용입니다. ]
CVS 사용을 위해서 PC에 최신버전인 CVS NT 2.5.04.3236 설치하고 설정을 해줬습니다.
그러나 계속 아래와 같은 에러가 나더군요...
에러 시점은 처음 프로젝트를 올린 이후 한글폴더명과 관련하여 작업시 문제더군요.
그래서 아래의 폴더 위치에 fileattr.xml 을 열어보면 작성이 되어져 있지 않더군요 @@;;
그러나 계속 아래와 같은 에러가 나더군요...
에러 시점은 처음 프로젝트를 올린 이후 한글폴더명과 관련하여 작업시 문제더군요.
그래서 아래의 폴더 위치에 fileattr.xml 을 열어보면 작성이 되어져 있지 않더군요 @@;;
The server reported an error while performing the "cvs checkout" command.
: XML error at line 1: Document is empty
:
: XML error at line 1: Start tag expected, '<' not found
:
: XML error at line 1: Document is empty
:
: XML error at line 1: Start tag expected, '<' not found
:
: cvs [server aborted]: Malformed fileattr.xml file in /프로젝트명/폴더명/CVS. Please fix or delete this file
수 많은 검색과 검색.... 답이 없더군요 ㅡㅡ;;
뭐 비슷한 답으로는 지우고 다시 해라는 것들... 그러나 정작 해결되지 않더군요
그렇게 헤메이다 보니... 한글파일이 있는 폴더만 그렇더군요.
그러다 어느곳에서 현재 CVS최신버전(CVS NT 2.5.04.3236) 의 버그라는 것 같더군요...
그래서 다른 버전인 CVSNT-2.5.03.2260.msi 을 찾아서 설치 했더니
언제 그랬냐는 듯이 아주 잘되더군요 -_-;; 몇일간의 삽질 끝에 이제는 잘되네요...
기념으로 CVSNT-2.5.03.2260.msi 버전 올립니다.
 CVSNT-2.5.03.2260.msi
Tomcat에 multi instance 만들기
2010. 4. 29. 10:04
원본 : http://azeditech.com/tomcat/multiple-tomcat-instances.html
Running multiple Tomcat instances on one server
Step 1: Install the Tomcat files
Download Tomcat 4.1 or 5.5, and unzip it into an appropriate directory. I usually put it in /usr/local, so it ends up in a directory called /usr/local/apache-tomcat-5.5.17 (5.5.17 being the current version as of this writing), and make a symlink named /usr/local/tomcat to that directory. When later versions come out, I can unzip them and relink, leaving the older version in case things don't work out (which rarely if ever happens, but I'm paranoid).
Step 2: Make directories for each instance
For each instance of Tomcat you're going to run, you'll need a directory that will be CATALINA_HOME. For example, you might make them /var/tomcat/serverA and /var/tomcat/serverB.
In each of these directories you need the following subdirectories: conf, logs, temp, webapps, and work.
Put a server.xml and web.xml file in the conf directory. You can get these from the conf directory of the directory where you put the tomcat installation files, although of course you should tighten up your server.xml a bit.
The webapps directory is where you'll put the web applications you want to run on the particular instance of Tomcat.
I like to have the Tomcat manager webapp installed on each instance, so I can play with the webapps, and see how many active sessions there are. See my instructions for configuring the Tomcat manager webapp.
Step 3: Configure the ports and/or addresses for each instance
Tomcat listens to at least two network ports, one for the shutdown command, and one or more for accepting requests. Two instances of Tomcat can't listen to the same port number on the same IP address, so you will need to edit your server.xml files to change the ports they listen to.
The first port to look at is the shutdown port. This is used by the command line shutdown script (actually, but the Java code it runs) to tell the Tomcat instance to shut itself down. This port is defined at the top of the server.xml file for the instance.
<Server port="8001" shutdown="_SHUTDOWN_COMMAND_" debug="0">
Make sure each instance uses a different port value. The port value will normally need to be higher than 1024, and shouldn't conflict with any other network service running on the same system. The shutdown string is the value that is sent to shut the server down. Note that Tomcat won't accept shutdown commands that come from other machines.
Unlike the other ports Tomcat listens to, the shutdown port can't be configured to listen to its port on a different IP address. It always listens on 127.0.0.1.
The other ports Tomcat listens to are configured with the <Connector> elements, for instance the HTTP or JK listeners. The port attribute configures which port to listen to. Setting this to a different value on the different Tomcat instances on a machine will avoid conflict.
Of course, you'll need to configure whatever connects to that Connector to use the different port. If a web server is used as the front end using mod_jk, mod_proxy, or the like, then this is simple enough - change your web server's configuration.
In some cases you may not want to do this, for instance you may not want to use a port other than 8080 for HTTP connectors. If you want all of your Tomcat intances to use the same port number, you'll need to use different IP addresses. The server system must be configured with multiple IP addresses, and the address attribute of the <Connector> element for each Tomcat instance will be set to the appropriate IP address.
Step 4: Startup
Startup scripts are a whole other topic, but here's the brief rundown. The main different from running a single Tomcat instance is you need to set CATALINA_BASE to the directory you set up for the particular instance you want to start (or stop). Here's a typical startup routine:
JAVA_HOME=/usr/java
JAVA_OPTS="-Xmx800m -Xms800m"
CATALINA_HOME=/usr/local/tomcat
CATALINA_BASE=/var/tomcat/serverA
export JAVA_HOME JAVA_OPTS CATALINA_HOME CATALINA_BASE

$CATALINA_HOME/bin/catalina.sh start
SKT 고객정보 암호화…해킹 '원천봉쇄'
2010. 1. 11. 14:44
http://media.daum.net/digital/view.html?cateid=1067&newsid=20100111063203238&p=yonhap
SKT 고객정보 암호화…해킹 '원천봉쇄'
연합뉴스 | 입력 2010.01.11 06:32 | 수정 2010.01.11 06:56 | 누가 봤을까? 20대 남성, 서울
(서울=연합뉴스) 박대한 기자 = SK텔레콤이 세계 최대 규모의 고객정보 데이터베이스(DB)를 암호화하는 데 성공했다.
이에 따라 SK텔레콤의 전산시스템이 해킹되더라도 고객정보가 대량 유출돼 악용되는 상황은 원천적으로 차단된다.
SK텔레콤은 고객정보 DB에 암호화를 적용해 구축한 시스템을 안정적으로 오픈했다고 11일 밝혔다.
이번 작업은 지난 2008년 6월 개정된 '정보통신망 이용촉진 및 정보보호 등에 관한 법률'에 따른 것으로, 불법적인 외부 침입자가 DB에 접근하더라도 피해를 최소화하기 위해 마련됐다.
정부는 해킹이나 DB 접속 권한을 가진 시스템 운영자에 의해 대량의 고객정보가 유출되는 사례가 잇따라 발생하자 시행령을 통해 2010년 1월 29일까지 이러한 DB 암호화 시스템을 구축하도록 했다.
SK텔레콤의 이번 고객 DB 암호화 프로젝트는 고객정보 보호 강화에 대한 최고경영자(CEO)의 강력한 뒷받침 하에 정보보안총괄임원(CSO) 주도로 약 1년간 진행됐다.
SK텔레콤은 3천본(프로그램 수를 나타내는 단위) 이상의 프로그램과 관련 테이블(DB 내 여러가지 표나 일람표를 자료 형태로 모아둔 것)에 대해 발생 가능한 모든 상황을 고려해 테스트를 거쳤다.
특히 200명 규모의 통합상황실을 구성해 연휴 기간인 지난 1∼3일 개발한 프로그램을 실제 운영시스템으로 옮기는 데이터 마이그레이션 작업을 18시간에 걸쳐 진행했다.
이번 시스템의 암호화 대상은 SK텔레콤 이동통신 및 기타 서비스 가입 고객, T-World 등 웹사이트 가입자, 내부 및 관계사 직원 등의 개인정보로, SK텔레콤은 이번에 암호화된 DB가 세계적으로도 유례를 찾아보기 힘들 정도로 대규모라고 설명했다.
SK텔레콤은 11개 주요 자회사에 대해서도 이달 말까지 고객정보 DB 암호화 조치를 완료할 계획이다.
SK텔레콤 관계자는 이번 고객 DB 암호화에 대해 "기존 보안 인프라와 보안 관리체계와의 시너지를 고려하면 강력한 고객정보 유출 방지체계가 구축된 만큼 고객 만족도가 크게 향상될 것"이라고 말했다.
SK텔레콤은 아이핀(I-PiN) 적용, 접근기록 위ㆍ변조 방지, 불법접근 차단 등의 개정 법안에 따른 추진과제들도 지난해 말까지 완료했다.
pdhis959@yna.co.kr
(끝)
Visual Studio 6 설치가 안될 때 해결하는 한가지 방법
2010. 1. 4. 17:18
[출처] http://darksoft.co.kr/204?category=7
Visual Studio 6 설치가 안될 때 해결하는 한가지 방법입니다.
아래 소프트웨어를 설치할 때, 'ACME setup 을 찾을 수 없습니다.'라는 메세지가 뜰 경우 대처법 입니다.
Microsoft Visual Studio 6.0
Microsoft Visual Basic Learning Edition for Windows 6.0
Microsoft Visual Basic Professional Edition for Windows 6.0
Microsoft Visual Basic Enterprise Edition for Windows 6.0
Microsoft Visual C++, 32-bit Enterprise Edition 6.0
Microsoft Visual C++, 32-bit Professional Edition 6.0
Microsoft Visual C++, 32-bit Learning Edition 6.0
Microsoft Visual InterDev 6.0
Microsoft Visual FoxPro for Windows 6.0
Microsoft Visual J++ 6.0
Microsoft Visual SourceSafe for Windows 6.0
해결법 :
도스 프롬프트에서 다음 방법으로 명령어를 친다.
D:\disk1\SETUP\ACMSETUP.EXE /T A.STF /S D:\ /n "" /o "" /k "YYYYYYYYYY" /b 1
여기에서 E 는 설치프로그램이 들어있는 드라이브명이고, A는 설치프로그램이 들어있는 드라이브 안에 있는 SETUP 폴더를 열었을 때, 보이는 STF 확장자 파일입니다. 예를 들면, Visual Studio 6.0 Enterprise 경우에는 VS98ENT.stf 파일입니다. YYYYYYYYYY는 설치프로그램의 시디키입니다. 시디키가 자동으로 등록된 것이라면 /k "YYYYYYYYYY" 는 생략하시면 됩니다.
이 명령어를 치면 해당 프로그램의 설치프로그램이 자동적으로 뜹니다.
트리구조 DB에서 사용하기 3
2009. 7. 13. 23:30
Storing Hierarchical Data in a Database
Automating the Tree Traversal
Now that you've seen some of the handy things you can do with this table, it's time to learn how we can automate the creation of this table. While it's a nice exercise the first time and with a small tree, we really need a script that does all this counting and tree walking for us.
Let's write a script that converts an adjacency list to a modified preorder tree traversal table.
<?php

function rebuild_tree($parent, $left) {

   // the right value of this node is the left value + 1

   $right = $left+1;


   // get all children of this node

   $result = mysql_query('SELECT title FROM tree '.

                          'WHERE parent="'.$parent.'";');

   while ($row = mysql_fetch_array($result)) {

       // recursive execution of this function for each

       // child of this node

       // $right is the current right value, which is

       // incremented by the rebuild_tree function

       $right = rebuild_tree($row['title'], $right);

   }


   // we've got the left value, and now that we've processed

   // the children of this node we also know the right value

   mysql_query('UPDATE tree SET lft='.$left.', rgt='.

                $right.' WHERE title="'.$parent.'";');


   // return the right value of this node + 1

   return $right+1;

}

?>
This is a recursive function. You should start it with rebuild_tree('Food',1); The function then retrieves all children of the ‘Food' node.
If there are no children, it sets its left and right values. The left value is given, 1, and the right value is the left value plus one. If there are children, this function is repeated and the last right value is returned. That value is then used as the right value of the ‘Food' node.
The recursion makes this a fairly complex function to understand. However, this function achieves the same result we did by hand at the beginning of this section. It walks around the tree, adding one for each node it sees. After you've run this function, you'll see that the left and right values are still the same (a quick check: the right value of the root node should be twice the number of nodes).
Adding a Node
How do we add a node to the tree? There are two approaches: you can keep the parent column in your table and just rerun the rebuild_tree() function -- a simple but not that elegant function; or you can update the left and right values of all nodes at the right side of the new node.
The first option is simple. You use the adjacency list method for updating, and the modified preorder tree traversal algorithm for retrieval. If you want to add a new node, you just add it to the table and set the parent column. Then, you simply rerun the rebuild_tree() function. This is easy, but not very efficient with large trees.
The second way to add, and delete nodes is to update the left and right values of all nodes to the right of the new node. Let's have a look at an example. We want to add a new type of fruit, a ‘Strawberry', as the last node and a child of ‘Red'. First, we'll have to make some space. The right value of ‘Red' should be changed from 6 to 8, the 7-10 ‘Yellow' node should be changed to 9-12 etc. Updating the ‘Red' node means that we'll have to add 2 to all left and right values greater than 5.
We'll use the query:
UPDATE tree SET rgt=rgt+2 WHERE rgt>5;

UPDATE tree SET lft=lft+2 WHERE lft>5;
Now we can add a new node ‘Strawberry' to fill the new space. This node has left 6 and right 7.
INSERT INTO tree SET lft=6, rgt=7, title='Strawberry';
If we run our display_tree() function, we'll see that our new ‘Strawberry' node has been successfully inserted into the tree:
Food

 Fruit

   Red

     Cherry

     Strawberry

   Yellow

     Banana

 Meat

   Beef

   Pork
Disadvantages
At first, the modified preorder tree traversal algorithm seems difficult to understand. It certainly is less simple than the adjacency list method. However, once you're used to the left and right properties, it becomes clear that you can do almost everything with this technique that you could do with the adjacency list method, and that the modified preorder tree traversal algorithm is much faster. Updating the tree takes more queries, which is slower, but retrieving the nodes is achieved with only one query.
Conclusion
You're now familiar with both ways to store trees in a database. While I have a slight preference for the modified preorder tree traversal, in your particular situation the adjacency list method might be better. I'll leave that to your own judgement.
One last note: as I've already said I don't recommend that you use the title of a node to refer to that node. You really should follow the basic rules of database normalization. I didn't use numerical ids because that would make the examples less readable.
Further Reading
More on Trees in SQL by database wizard Joe Celko:
http://searchdatabase.techtarget.com/tip/1,289483,sid13_gci537290,00.html
Two other ways to handle hierarchical data:
http://www.evolt.org/article/Four_ways_to_work_with_hierarchical_data/17/4047/index.html
Xindice, the ‘native XML database':
http://xml.apache.org/xindice/
An explanation of recursion:
http://www.strath.ac.uk/IT/Docs/Ccourse/subsection3_9_5.html
트리구조 DB에서 사용하기 2
2009. 7. 13. 23:27
Storing Hierarchical Data in a Database
Modified Preorder Tree Traversal
Now, let's have a look at another method for storing trees. Recursion can be slow, so we would rather not use a recursive function. We'd also like to minimize the number of database queries. Preferably, we'd have just one query for each activity.
We'll start by laying out our tree in a horizontal way. Start at the root node (‘Food'), and write a 1 to its left. Follow the tree to ‘Fruit' and write a 2 next to it. In this way, you walk (traverse) along the edges of the tree while writing a number on the left and right side of each node. The last number is written at the right side of the ‘Food' node. In this image, you can see the whole numbered tree, and a few arrows to indicate the numbering order.
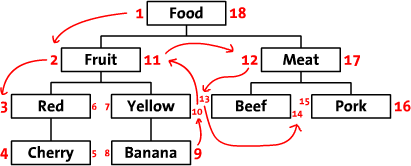
We'll call these numbers left and right (e.g. the left value of ‘Food' is 1, the right value is 18). As you can see, these numbers indicate the relationship between each node. Because ‘Red' has the numbers 3 and 6, it is a descendant of the 1-18 ‘Food' node. In the same way, we can say that all nodes with left values greater than 2 and right values less than 11, are descendants of 2-11 ‘Fruit'. The tree structure is now stored in the left and right values. This method of walking around the tree and counting nodes is called the ‘modified preorder tree traversal' algorithm.
Before we continue, let's see how these values look in our table:
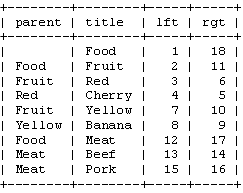
Note that the words ‘left' and ‘right' have a special meaning in SQL. Therefore, we'll have to use ‘lft' and ‘rgt' to identify the columns. Also note that we don't really need the ‘parent' column anymore. We now have the lft and rgt values to store the tree structure.
Retrieve the Tree
If you want to display the tree using a table with left and right values, you'll first have to identify the nodes that you want to retrieve. For example, if you want the ‘Fruit' subtree, you'll have to select only the nodes with a left value between 2 and 11. In SQL, that would be:
SELECT * FROM tree WHERE lft BETWEEN 2 AND 11;
That returns:

Well, there it is: a whole tree in one query. To display this tree like we did our recursive function, we'll have to add an ORDER BY clause to this query. If you add and delete rows from your table, your table probably won't be in the right order. We should therefore order the rows by their left value.
SELECT * FROM tree WHERE lft BETWEEN 2 AND 11 ORDER BY lft ASC;
The only problem left is the indentation.
To show the tree structure, children should be indented slightly more than their parent. We can do this by keeping a stack of right values. Each time you start with the children of a node, you add the right value of that node to the stack. You know that all children of that node have a right value that is less than the right value of the parent, so by comparing the right value of the current node with the last right node in the stack, you can see if you're still displaying the children of that parent. When you're finished displaying a node, you remove its right value from the stack. If you count the elements in the stack, you'll get the level of the current node.
<?php

function display_tree($root) {

   // retrieve the left and right value of the $root node

   $result = mysql_query('SELECT lft, rgt FROM tree '.

                          'WHERE title="'.$root.'";');

   $row = mysql_fetch_array($result);


   // start with an empty $right stack

   $right = array();


   // now, retrieve all descendants of the $root node

   $result = mysql_query('SELECT title, lft, rgt FROM tree '.

                          'WHERE lft BETWEEN '.$row['lft'].' AND '.

                          $row['rgt'].' ORDER BY lft ASC;');


   // display each row

   while ($row = mysql_fetch_array($result)) {

       // only check stack if there is one

       if (count($right)>0) {

           // check if we should remove a node from the stack

           while ($right[count($right)-1]<$row['rgt']) {

               array_pop($right);

           }

       }


       // display indented node title

       echo str_repeat('  ',count($right)).$row['title']."\n";


       // add this node to the stack

       $right[] = $row['rgt'];

   }

}

?>
If you run this code, you'll get exactly the same tree as with the recursive function discussed above. Our new function will probably be faster: it isn't recursive and it only uses two queries.
The Path to a Node
With this new algorithm, we'll also have to find a new way to get the path to a specific node. To get this path, we'll need a list of all ancestors of that node.
With our new table structure, that really isn't much work. When you look at, for example, the 4-5 ‘Cherry' node, you'll see that the left values of all ancestors are less than 4, while all right values are greater than 5. To get all ancestors, we can use this query:
SELECT title FROM tree WHERE lft < 4 AND rgt > 5 ORDER BY lft ASC;
Note that, just like in our previous query, we have to use an ORDER BY clause to sort the nodes. This query will return:
+-------+

| title |

+-------+

| Food |

| Fruit |

| Red |

+-------+
We now only have to join the rows to get the path to ‘Cherry'.
How Many Descendants
If you give me the left and right values of a node, I can tell you how many descendants it has by using a little math.
As each descendant increments the right value of the node with 2, the number of descendants can be calculated with:
descendants = (right – left - 1) / 2
With this simple formula, I can tell you that the 2-11 ‘Fruit' node has 4 descendant nodes and that the 8-9 ‘Banana' node is just a child, not a parent.
트리구조 DB에서 사용하기 1
2009. 7. 13. 23:13
Storing Hierarchical Data in a Database
By Gijs Van Tulder
http://www.sitepoint.com/article/hierarchical-data-database/
April 30th 2003
Reader Rating: 9.2
Whether you want to build your own forum, publish the messages from a mailing list on your Website, or write your own cms: there will be a moment that you'll want to store hierarchical data in a database. And, unless you're using a XML-like database, tables aren't hierarchical; they're just a flat list. You'll have to find a way to translate the hierarchy in a flat file.
Storing trees is a common problem, with multiple solutions. There are two major approaches: the adjacency list model, and the modified preorder tree traversal algorithm.
In this article, we'll explore these two methods of saving hierarchical data. I'll use the tree from a fictional online food store as an example. This food store organizes its food by category, by colour and by type. The tree looks like this:
This article contains a number of code examples that show how to save and retrieve data. Because I use that language myself, and many other people use or know that language too, I chose to write the examples in PHP. You can probably easily translate them to your own language of choice.
The Adjacency List Model
The first, and most elegant, approach we'll try is called the ‘adjacency list model' or the ‘recursion method'. It's an elegant approach because you'll need just one, simple function to iterate through your tree. In our food store, the table for an adjacency list looks like this:

As you can see, in the adjacency list method, you save the ‘parent' of each node. We can see that ‘Pear' is a child of ‘Green', which is a child of ‘Fruit' and so on. The root node, ‘Food', doesn't have a parent value. For simplicity, I've used the ‘title' value to identify each node. Of course, in a real database, you'd use the numerical id of each node.
Give Me the Tree
Now that we've inserted our tree in the database, it's time to write a display function. This function will have to start at the root node -- the node with no parent -- and should then display all children of that node. For each of these children, the function should retrieve and display all the child nodes of that child. For these children, the function should again display all children, and so on.
As you might have noticed, there's a regular pattern in the description of this function. We can simply write one function, which retrieves the children of a certain parent node. That function should then start another instance of itself for each of these children, to display all their children. This is the recursive mechanism that gives the ‘recursion method' its name.
<?php

// $parent is the parent of the children we want to see

// $level is increased when we go deeper into the tree,

//        used to display a nice indented tree

function display_children($parent, $level) {

   // retrieve all children of $parent

   $result = mysql_query('SELECT title FROM tree '.

                          'WHERE parent="'.$parent.'";');


   // display each child

   while ($row = mysql_fetch_array($result)) {

       // indent and display the title of this child

       echo str_repeat('  ',$level).$row['title']."\n";


       // call this function again to display this

       // child's children

       display_children($row['title'], $level+1);

   }

}

?>
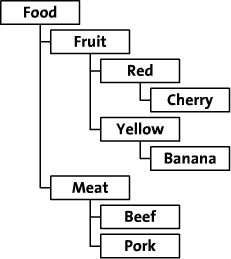
To display our whole tree, we'll run the function with an empty string as $parent and $level = 0: display_children('',0); For our food store tree, the function returns:
Food

Fruit

Red

Cherry

Yellow

Banana

Meat

Beef

Pork
Note that if you just want to see a subtree, you can tell the function to start with another node. For example, to display the ‘Fruit' subtree, you would run display_children('Fruit',0);
The Path to a Node
With almost the same function, it's possible to look up the path to a node if you only know the name or id of that node. For instance, the path to ‘Cherry' is ‘Food' > ‘Fruit' > ‘Red'. To get this path, our function will have to start at the deepest level: ‘Cherry'. It then looks up the parent of this node and adds this to the path. In our example, this would be ‘Red'. If we know that ‘Red' is the parent of ‘Cherry', we can calculate the path to ‘Cherry' by using the path to ‘Red'. And that's given by the function we've just used: by recursively looking up parents, we'll get the path to any node in the tree.
<?php

// $node is the name of the node we want the path of

function get_path($node) {

   // look up the parent of this node

   $result = mysql_query('SELECT parent FROM tree '.

                          'WHERE title="'.$node.'";');

   $row = mysql_fetch_array($result);


   // save the path in this array

   $path = array();


   // only continue if this $node isn't the root node

   // (that's the node with no parent)

   if ($row['parent']!='') {

       // the last part of the path to $node, is the name

       // of the parent of $node

       $path[] = $row['parent'];


       // we should add the path to the parent of this node

       // to the path

       $path = array_merge(get_path($row['parent']), $path);

   }


   // return the path

   return $path;

}

?>
This function now returns the path to a given node. It returns that path as an array, so to display the path we can use print_r(get_path('Cherry')); If you do this for 'Cherry', you'll see:
Array

(

   [0] => Food

   [1] => Fruit

   [2] => Red

)
Disadvantages
As we've just seen, this is a great method. It's easy to understand, and the code we need is simple, too. What then, are the downsides of the adjacency list model? In most programming languages, it's slow and inefficient. This is mainly caused by the recursion. We need one database query for each node in the tree.
As each query takes some time, this makes the function very slow when dealing with large trees.
The second reason this method isn't that fast, is the programming language you'll probably use. Unlike languages such as Lisp, most languages aren't designed for recursive functions. For each node, the function starts another instance of itself. So, for a tree with four levels, you'll be running four instances of the function at the same time. As each function occupies a slice of memory and takes some time to initiate, recursion is very slow when applied to large trees.
MySQL 서비스 재시작
2009. 6. 20. 17:00
서비스 종료
mysqladmin -uroot -p shutdown
서비스 시작
mysqladmin -uroot -p start 또는
./mysqld_safe &
mysqladmin -uroot -p shutdown
서비스 시작
mysqladmin -uroot -p start 또는
./mysqld_safe &
zendamf 설치하기
2009. 6. 20. 10:40
머드초보님의 블로그에 잘 설명되어 있습니다.
http://mudchobo.tomeii.com/tt/398
http://mudchobo.tomeii.com/tt/398