컴퓨터
- Flex 3 컨트롤 샘플들 2009.07.29
- Flex에서 Theme 적용 방법 2009.07.21
- 트리구조 DB에서 사용하기 3 2009.07.13
- 트리구조 DB에서 사용하기 2 2009.07.13
- 트리구조 DB에서 사용하기 1 2009.07.13 1
- FLEX BlaseDS Tomcat6 JDBC MSSQL에서 JNDI 설정 2009.07.02
- BlazeDS 사용 2009.06.30
- Linux에서 특수문자 파일 지우기 2009.06.27
- Zendamf Flex 디버깅 2009.06.21
- MySQL 서비스 재시작 2009.06.20
Flex 3 컨트롤 샘플들
Flex에서 Theme 적용 방법
테마파일을 받아서 적용하는 법입니다.
전에 모아 놓았던 것을 이제서야 한번 보게 되네요.
프로젝트에서 Properties로 들어가고, Flex Compiler로 들어갑니다.
flekristal theme을 사용한다고 할때, compiler.theme 옵션을 다음과 같이 추가합니다.
-compiler.theme=./theme/flekristal/src/flekristal.css
swc 파일을 추가한다면
-theme=../theme/theme.swc 을 추가합니다.
추가하고 컴파일을 다시 해야만 합니다.
지돌스타님 블로그를 참고하였습니다.
http://blog.jidolstar.com/380
트리구조 DB에서 사용하기 3
Storing Hierarchical Data in a Database
Automating the Tree Traversal
Now that you've seen some of the handy things you can do with this table, it's time to learn how we can automate the creation of this table. While it's a nice exercise the first time and with a small tree, we really need a script that does all this counting and tree walking for us.
Let's write a script that converts an adjacency list to a modified preorder tree traversal table.
<?php

function rebuild_tree($parent, $left) {

   // the right value of this node is the left value + 1

   $right = $left+1;


   // get all children of this node

   $result = mysql_query('SELECT title FROM tree '.

                          'WHERE parent="'.$parent.'";');

   while ($row = mysql_fetch_array($result)) {

       // recursive execution of this function for each

       // child of this node

       // $right is the current right value, which is

       // incremented by the rebuild_tree function

       $right = rebuild_tree($row['title'], $right);

   }


   // we've got the left value, and now that we've processed

   // the children of this node we also know the right value

   mysql_query('UPDATE tree SET lft='.$left.', rgt='.

                $right.' WHERE title="'.$parent.'";');


   // return the right value of this node + 1

   return $right+1;

}

?>
This is a recursive function. You should start it with rebuild_tree('Food',1); The function then retrieves all children of the ‘Food' node.
If there are no children, it sets its left and right values. The left value is given, 1, and the right value is the left value plus one. If there are children, this function is repeated and the last right value is returned. That value is then used as the right value of the ‘Food' node.
The recursion makes this a fairly complex function to understand. However, this function achieves the same result we did by hand at the beginning of this section. It walks around the tree, adding one for each node it sees. After you've run this function, you'll see that the left and right values are still the same (a quick check: the right value of the root node should be twice the number of nodes).
Adding a Node
How do we add a node to the tree? There are two approaches: you can keep the parent column in your table and just rerun the rebuild_tree() function -- a simple but not that elegant function; or you can update the left and right values of all nodes at the right side of the new node.
The first option is simple. You use the adjacency list method for updating, and the modified preorder tree traversal algorithm for retrieval. If you want to add a new node, you just add it to the table and set the parent column. Then, you simply rerun the rebuild_tree() function. This is easy, but not very efficient with large trees.
The second way to add, and delete nodes is to update the left and right values of all nodes to the right of the new node. Let's have a look at an example. We want to add a new type of fruit, a ‘Strawberry', as the last node and a child of ‘Red'. First, we'll have to make some space. The right value of ‘Red' should be changed from 6 to 8, the 7-10 ‘Yellow' node should be changed to 9-12 etc. Updating the ‘Red' node means that we'll have to add 2 to all left and right values greater than 5.
We'll use the query:
UPDATE tree SET rgt=rgt+2 WHERE rgt>5;

UPDATE tree SET lft=lft+2 WHERE lft>5;
Now we can add a new node ‘Strawberry' to fill the new space. This node has left 6 and right 7.
INSERT INTO tree SET lft=6, rgt=7, title='Strawberry';
If we run our display_tree() function, we'll see that our new ‘Strawberry' node has been successfully inserted into the tree:
Food

 Fruit

   Red

     Cherry

     Strawberry

   Yellow

     Banana

 Meat

   Beef

   Pork
Disadvantages
At first, the modified preorder tree traversal algorithm seems difficult to understand. It certainly is less simple than the adjacency list method. However, once you're used to the left and right properties, it becomes clear that you can do almost everything with this technique that you could do with the adjacency list method, and that the modified preorder tree traversal algorithm is much faster. Updating the tree takes more queries, which is slower, but retrieving the nodes is achieved with only one query.
Conclusion
You're now familiar with both ways to store trees in a database. While I have a slight preference for the modified preorder tree traversal, in your particular situation the adjacency list method might be better. I'll leave that to your own judgement.
One last note: as I've already said I don't recommend that you use the title of a node to refer to that node. You really should follow the basic rules of database normalization. I didn't use numerical ids because that would make the examples less readable.
Further Reading
More on Trees in SQL by database wizard Joe Celko:
http://searchdatabase.techtarget.com/tip/1,289483,sid13_gci537290,00.html
Two other ways to handle hierarchical data:
http://www.evolt.org/article/Four_ways_to_work_with_hierarchical_data/17/4047/index.html
Xindice, the ‘native XML database':
http://xml.apache.org/xindice/
An explanation of recursion:
http://www.strath.ac.uk/IT/Docs/Ccourse/subsection3_9_5.html
트리구조 DB에서 사용하기 2
Storing Hierarchical Data in a Database
Modified Preorder Tree Traversal
Now, let's have a look at another method for storing trees. Recursion can be slow, so we would rather not use a recursive function. We'd also like to minimize the number of database queries. Preferably, we'd have just one query for each activity.
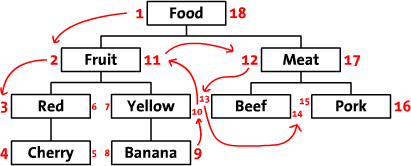
We'll start by laying out our tree in a horizontal way. Start at the root node (‘Food'), and write a 1 to its left. Follow the tree to ‘Fruit' and write a 2 next to it. In this way, you walk (traverse) along the edges of the tree while writing a number on the left and right side of each node. The last number is written at the right side of the ‘Food' node. In this image, you can see the whole numbered tree, and a few arrows to indicate the numbering order.
We'll call these numbers left and right (e.g. the left value of ‘Food' is 1, the right value is 18). As you can see, these numbers indicate the relationship between each node. Because ‘Red' has the numbers 3 and 6, it is a descendant of the 1-18 ‘Food' node. In the same way, we can say that all nodes with left values greater than 2 and right values less than 11, are descendants of 2-11 ‘Fruit'. The tree structure is now stored in the left and right values. This method of walking around the tree and counting nodes is called the ‘modified preorder tree traversal' algorithm.
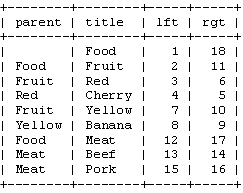
Before we continue, let's see how these values look in our table:
Note that the words ‘left' and ‘right' have a special meaning in SQL. Therefore, we'll have to use ‘lft' and ‘rgt' to identify the columns. Also note that we don't really need the ‘parent' column anymore. We now have the lft and rgt values to store the tree structure.
Retrieve the Tree
If you want to display the tree using a table with left and right values, you'll first have to identify the nodes that you want to retrieve. For example, if you want the ‘Fruit' subtree, you'll have to select only the nodes with a left value between 2 and 11. In SQL, that would be:
SELECT * FROM tree WHERE lft BETWEEN 2 AND 11;
That returns:
Well, there it is: a whole tree in one query. To display this tree like we did our recursive function, we'll have to add an ORDER BY clause to this query. If you add and delete rows from your table, your table probably won't be in the right order. We should therefore order the rows by their left value.
SELECT * FROM tree WHERE lft BETWEEN 2 AND 11 ORDER BY lft ASC;
The only problem left is the indentation.
To show the tree structure, children should be indented slightly more than their parent. We can do this by keeping a stack of right values. Each time you start with the children of a node, you add the right value of that node to the stack. You know that all children of that node have a right value that is less than the right value of the parent, so by comparing the right value of the current node with the last right node in the stack, you can see if you're still displaying the children of that parent. When you're finished displaying a node, you remove its right value from the stack. If you count the elements in the stack, you'll get the level of the current node.
<?php

function display_tree($root) {

   // retrieve the left and right value of the $root node

   $result = mysql_query('SELECT lft, rgt FROM tree '.

                          'WHERE title="'.$root.'";');

   $row = mysql_fetch_array($result);


   // start with an empty $right stack

   $right = array();


   // now, retrieve all descendants of the $root node

   $result = mysql_query('SELECT title, lft, rgt FROM tree '.

                          'WHERE lft BETWEEN '.$row['lft'].' AND '.

                          $row['rgt'].' ORDER BY lft ASC;');


   // display each row

   while ($row = mysql_fetch_array($result)) {

       // only check stack if there is one

       if (count($right)>0) {

           // check if we should remove a node from the stack

           while ($right[count($right)-1]<$row['rgt']) {

               array_pop($right);

           }

       }


       // display indented node title

       echo str_repeat('  ',count($right)).$row['title']."\n";


       // add this node to the stack

       $right[] = $row['rgt'];

   }

}

?>
If you run this code, you'll get exactly the same tree as with the recursive function discussed above. Our new function will probably be faster: it isn't recursive and it only uses two queries.
The Path to a Node
With this new algorithm, we'll also have to find a new way to get the path to a specific node. To get this path, we'll need a list of all ancestors of that node.
With our new table structure, that really isn't much work. When you look at, for example, the 4-5 ‘Cherry' node, you'll see that the left values of all ancestors are less than 4, while all right values are greater than 5. To get all ancestors, we can use this query:
SELECT title FROM tree WHERE lft < 4 AND rgt > 5 ORDER BY lft ASC;
Note that, just like in our previous query, we have to use an ORDER BY clause to sort the nodes. This query will return:
+-------+

| title |

+-------+

| Food |

| Fruit |

| Red |

+-------+
We now only have to join the rows to get the path to ‘Cherry'.
How Many Descendants
If you give me the left and right values of a node, I can tell you how many descendants it has by using a little math.
As each descendant increments the right value of the node with 2, the number of descendants can be calculated with:
descendants = (right – left - 1) / 2
With this simple formula, I can tell you that the 2-11 ‘Fruit' node has 4 descendant nodes and that the 8-9 ‘Banana' node is just a child, not a parent.
트리구조 DB에서 사용하기 1
By Gijs Van Tulder
http://www.sitepoint.com/article/hierarchical-data-database/
April 30th 2003
Reader Rating: 9.2
Whether you want to build your own forum, publish the messages from a mailing list on your Website, or write your own cms: there will be a moment that you'll want to store hierarchical data in a database. And, unless you're using a XML-like database, tables aren't hierarchical; they're just a flat list. You'll have to find a way to translate the hierarchy in a flat file.
Storing trees is a common problem, with multiple solutions. There are two major approaches: the adjacency list model, and the modified preorder tree traversal algorithm.
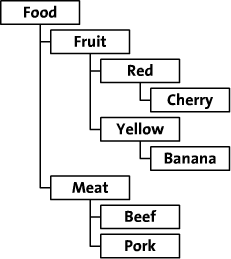
In this article, we'll explore these two methods of saving hierarchical data. I'll use the tree from a fictional online food store as an example. This food store organizes its food by category, by colour and by type. The tree looks like this:
This article contains a number of code examples that show how to save and retrieve data. Because I use that language myself, and many other people use or know that language too, I chose to write the examples in PHP. You can probably easily translate them to your own language of choice.
The Adjacency List Model
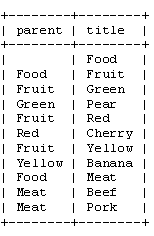
The first, and most elegant, approach we'll try is called the ‘adjacency list model' or the ‘recursion method'. It's an elegant approach because you'll need just one, simple function to iterate through your tree. In our food store, the table for an adjacency list looks like this:
As you can see, in the adjacency list method, you save the ‘parent' of each node. We can see that ‘Pear' is a child of ‘Green', which is a child of ‘Fruit' and so on. The root node, ‘Food', doesn't have a parent value. For simplicity, I've used the ‘title' value to identify each node. Of course, in a real database, you'd use the numerical id of each node.
Give Me the Tree
Now that we've inserted our tree in the database, it's time to write a display function. This function will have to start at the root node -- the node with no parent -- and should then display all children of that node. For each of these children, the function should retrieve and display all the child nodes of that child. For these children, the function should again display all children, and so on.
As you might have noticed, there's a regular pattern in the description of this function. We can simply write one function, which retrieves the children of a certain parent node. That function should then start another instance of itself for each of these children, to display all their children. This is the recursive mechanism that gives the ‘recursion method' its name.
<?php

// $parent is the parent of the children we want to see

// $level is increased when we go deeper into the tree,

//        used to display a nice indented tree

function display_children($parent, $level) {

   // retrieve all children of $parent

   $result = mysql_query('SELECT title FROM tree '.

                          'WHERE parent="'.$parent.'";');


   // display each child

   while ($row = mysql_fetch_array($result)) {

       // indent and display the title of this child

       echo str_repeat('  ',$level).$row['title']."\n";


       // call this function again to display this

       // child's children

       display_children($row['title'], $level+1);

   }

}

?>
To display our whole tree, we'll run the function with an empty string as $parent and $level = 0: display_children('',0); For our food store tree, the function returns:
Food

Fruit

Red

Cherry

Yellow

Banana

Meat

Beef

Pork
Note that if you just want to see a subtree, you can tell the function to start with another node. For example, to display the ‘Fruit' subtree, you would run display_children('Fruit',0);
The Path to a Node
With almost the same function, it's possible to look up the path to a node if you only know the name or id of that node. For instance, the path to ‘Cherry' is ‘Food' > ‘Fruit' > ‘Red'. To get this path, our function will have to start at the deepest level: ‘Cherry'. It then looks up the parent of this node and adds this to the path. In our example, this would be ‘Red'. If we know that ‘Red' is the parent of ‘Cherry', we can calculate the path to ‘Cherry' by using the path to ‘Red'. And that's given by the function we've just used: by recursively looking up parents, we'll get the path to any node in the tree.
<?php

// $node is the name of the node we want the path of

function get_path($node) {

   // look up the parent of this node

   $result = mysql_query('SELECT parent FROM tree '.

                          'WHERE title="'.$node.'";');

   $row = mysql_fetch_array($result);


   // save the path in this array

   $path = array();


   // only continue if this $node isn't the root node

   // (that's the node with no parent)

   if ($row['parent']!='') {

       // the last part of the path to $node, is the name

       // of the parent of $node

       $path[] = $row['parent'];


       // we should add the path to the parent of this node

       // to the path

       $path = array_merge(get_path($row['parent']), $path);

   }


   // return the path

   return $path;

}

?>
This function now returns the path to a given node. It returns that path as an array, so to display the path we can use print_r(get_path('Cherry')); If you do this for 'Cherry', you'll see:
Array

(

   [0] => Food

   [1] => Fruit

   [2] => Red

)
Disadvantages
As we've just seen, this is a great method. It's easy to understand, and the code we need is simple, too. What then, are the downsides of the adjacency list model? In most programming languages, it's slow and inefficient. This is mainly caused by the recursion. We need one database query for each node in the tree.
As each query takes some time, this makes the function very slow when dealing with large trees.
The second reason this method isn't that fast, is the programming language you'll probably use. Unlike languages such as Lisp, most languages aren't designed for recursive functions. For each node, the function starts another instance of itself. So, for a tree with four levels, you'll be running four instances of the function at the same time. As each function occupies a slice of memory and takes some time to initiate, recursion is very slow when applied to large trees.
FLEX BlaseDS Tomcat6 JDBC MSSQL에서 JNDI 설정
먼저 다음과 같은 설치가 되어 있습니다. 버젼은 현재 제가 사용하는 것입니다.
개발용이라 local에 모두 설치했습니다.
1. JDK 설치 (1.6.0_13)
2. Tomcat 설치 (6.0.20)
3. Eclipse 설치 (Galileo)
4. Flex 설치 (3.3)
5. BlazeDS 설치 (3.2.0.3978)
지돌스타님의 블로그에 방문해서 5번까지 설치합니다.
6. MSSQL JDBC Driver : sqljdbc (2.0.1803.100)
간단하게는 sqljdbc4.jar를 tomcat home 밑에 lib 디렉토리에 복사하면 됩니다.
다음과 같이 하면 MSSQL과 연결이 됩니다.
import java.sql.Connection;
import java.sql.*;
ArrayList<Member> al = new ArrayList<Member>();
try {
// Class.forName("com.microsoft.sqlserver.jdbc.SQLServerDriver"); sqljdbc4부터는 안써도 된다네요.
String connectionUrl = "jdbc:sqlserver://192.168.0.10:1433;" +
"databaseName=ABCD;user=username;password=password;";
Connection con = DriverManager.getConnection(connectionUrl);
String SQL = "SELECT * FROM tablename where lastname='" + name + "'";
Statement stmt = con.createStatement();
ResultSet rs = stmt.executeQuery(SQL);
while (rs.next()) {
al.add(new Member("abcd",30,"test1"));
al.add(new Member("efgh",31,"test2"));
al.add(new Member(rs.getString("emp"),1,rs.getString("lastname")));
}
rs.close();
stmt.close();
con.close();
return al;
하지만 Tomcat의 DB Pooling 기능을 이용하려면 JNDI를 이용해야 한다고 합니다.
import를 먼저 합니다.
import javax.naming.InitialContext;
import javax.naming.NamingException;
import javax.sql.DataSource;
ArrayList<Member> al = new ArrayList<Member>();
try {
Context initCtx = new InitialContext();
Context envCtx = (Context) initCtx.lookup("java:comp/env");
DataSource ds = (DataSource) envCtx.lookup("jdbc/EmployeeDB");
Connection con = ds.getConnection();
String SQL = "SELECT * FROM tablename where lastname='" + name + "'";
Statement stmt = con.createStatement();
ResultSet rs = stmt.executeQuery(SQL);
while (rs.next()) {
al.add(new Member("abcd",30,"test1"));
al.add(new Member("efgh",31,"test2"));
al.add(new Member(rs.getString("emp"),1,rs.getString("lastname")));
}
rs.close();
stmt.close();
con.close();
return al;
소스를 위처럼 바꾸고
Eclipse에서 Project Explorer에 보면 Servers가 있는데 여기에 context.xml과 server.xml를 수정합니다. 기존에 있는 것은 두고 ResourceLink와 Resource만 추가하면 됩니다.
[context.xml]
...
<ResourceLink name="jdbc/EmployeeDB" global="jdbc/EmployeeDB" type="javax.sql.DataSource"/>
</Context>
[server.xml]
.....
<Resource name="jdbc/EmployeeDB"
auth="Container"
type="javax.sql.DataSource"
username="username"
password="password"
driverClassName="com.microsoft.sqlserver.jdbc.SQLServerDriver"
url="jdbc:sqlserver://192.168.0.10:1433;DatabaseName=ABCD"
maxActive="8"
maxIdle="4"/>
</GlobalNamingResources>
BlazeDS 사용
지돌스타님의 블로그에 설명이 잘 되어 있습니다.
Linux에서 특수문자 파일 지우기
실수로 특수문자가 파일이름에 들어갔을때 지워지지가 않는다. 이럴때 하는 방법
지우려는 파일이 --weirdname이라면
# ls -i
115118 --weirdname
# find . -inum 115118 -exec rm -f {} \;
하면 지워진다.
참고 : http://cafe.naver.com/lrisconsulting.cafe?iframe_url=/ArticleRead.nhn%3Farticleid=421
Zendamf Flex 디버깅
MySQL 서비스 재시작
mysqladmin -uroot -p shutdown
서비스 시작
mysqladmin -uroot -p start 또는
./mysqld_safe &


